[ Home ] [ Site Map ] [ Site Search ] [ Back to last page ]
Scandisk and Defrag are important utilities that come with Windows, to help you tune up your Windows filesystem and make sure it's running properly. Scandisk checks your drive to make sure there aren't any problems with it, and Defrag (short for Disk Defragmenter) organizes your filesystem to help Windows read files faster.
You can usually find Scandisk and Defrag on your Start menu under "Programs" then "Accessories" and "System Tools". Another easy way to access both programs is to open "My Computer", and right-click on the drive you want to tune up. On the context menu choose "Properties" and then select the "Tools" tab. If you use this second method to start Scandisk and Defrag, you should see a window like this:
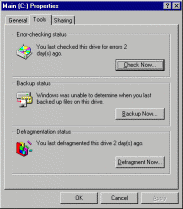
As you can see, this window tells you how long it's been since you last ran Scandisk or Defrag on this drive. If you see a message like "Windows was unable to determine when you last checked this drive for errors", or "Windows was unable to determine when you last defragmented this drive", then you probably haven't done it since Windows was installed.
Just like you periodically get your oil changed in your car, you should run Scandisk and Defrag now and then, to keep everything running smoothly. You should run Scandisk and Defrag at least once a month. Later versions of Windows (Windows 95B a/k/a OSR2 and later) will automatically run the DOS version of Scandisk before starting up, if the computer was not shut down properly before this boot. On these systems running Scandisk regularly is not as important, although there are some problems that the DOS version of Scandisk will not repair.
It should be noted that running Scandisk and Defrag more than once a month is still helpful. Also, the more often you run Defrag, the less time it will take, because there is less work to do.
When you first start Scandisk, you should be greeted by a window similar to this:
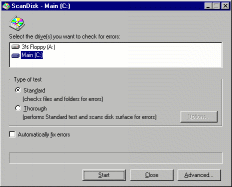
At the top you will find a box that lets you select which drives you would like to check for errors. If you want to have Scandisk check multiple drives, you can hold down the Ctrl key while selecting them. Usually you will just select the one drive you are interested in.
Moving downwards, there are two radio buttons, called Standard and Thorough. A standard test completes fairly quickly, but only checks the FAT tables and directory entries. The Thorough test can take a long time, but performs a test on each sector of a drive. This test is similar to the one performed when formatting the drive.
Almost all of the time, I would recommend using the Standard option. Any errors that are not due to a failure of the hardware can be detected with a Standard scandisk. On the other hand, if you suspect the hardware is having problems, or sectors on the drive are going bad, choose the Thorough option.
The checkbox near the bottom named "Automatically fix errors" is controls the behaviour of Scandisk when a problem is found. If you leave this box unchecked, Scandisk will stop and ask you what course of action to take, for each error it finds. Scandisk's default actions are pretty safe, so it's okay to leave this checked.
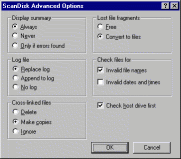
The image to the left shows the dialogue box presented after clicking the Advanced button. The default settings are shown here, and there is little reason to change them.
Most of the settings are self-explanatory. "Check host drive first" applies only to compressed drives. A compressed drive must be contained within an uncompressed drive, and checking this option tells Scandisk the uncompressed drive first. For a description of what "Lost file fragments" and "Cross-linked files" are, see the Technical Information section below.
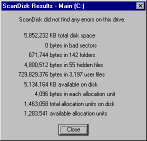
The image to the right shows the Scandisk results window. "KB total disk space" is the usable size of your disk, left over after the FAT filesystem overhead. "KB available on disk" is the total free space left. "Bytes in each allocation unit" is the cluster size of this filesystem. "Allocation units on disk" and "available allocation units" are the same as "KB total disk space" and "KB available on disk", respectively, except expressed in units of clusters instead of kilobytes. To convert from clusters to kilobytes, you can multiply by the "bytes in each allocation unit" field, then divide by 1024.
"Bytes in bad sectors" shows the number of bytes used up by clusters that have been marked bad (unusable). A small number of bytes in bad sectors (less than 100000) is normal, as is finding a new one now and then. On the other hand, if your drive regularly finds new bad sectors, it is probably time to think about replacing the drive.
The other fields are self-explanatory, and just show the number of bytes taken up by different types of files on your system.

After starting Defrag, you will see a window similar to this, asking which drive you would like to defragment. Unlike Scandisk, there is no way to select multiple drives simultaneously. In Windows 98, the defragmentation process will start as soon as you hit the `OK' button, so the `Settings' button is also on this window.

To the right is the main Defrag window. Under Windows 95, you will usually just click the `Start' button. Under Windows 98, Defrag will automatically start working, so there is no need. The `Advanced' button here takes you to Defrag's settings.
After Defrag has started working, it will display a percentage bar showing how much of the drive has been defragmented already. At this time you can click the `Show Details' button if you wish to watch Defrag moving the blocks of data around your drive. It isn't a very useful option, but it can be fun to watch, especially if you're bored waiting for your Defrag to finish. If you have a slower computer, using this option may slow Defrag down noticably, but anything faster than a Pentium 166 with a decent video card won't experience a significant slowdown.
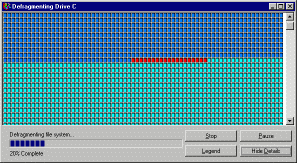
On the left you can see a screenshot of Defrag in action, when Show Details mode is on. Hitting the Legend button will show a chart detailing what the different coloured blocks mean. The Pause button will halt Defrag temporarily, and Stop will cancel your defragmentation.
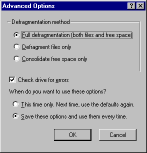
Here is a screenshot of the Defrag settings under Windows 95. The default options are shown here. There are 3 choices for the Defragmentation Method. The first is `Full', which is the best choice. It moves files so that they occupy continuous ranges of clusters, and Windows can read them faster. It also tries to make the space not used up by files into one large block. The second choice is `Files only'. With this option you will get the benefits of defragmenting the filesystem, but since the free space may still be scattered around the disk, new information written to the disk will more easily become fragmented again. The third option, `Free space only', doesn't optimise any of your current files, but will help make sure new ones do not fragment.
You should leave the "Check drive for errors" option checked. It doesn't take much time to do a quick check of your drive before the Defrag, and you risk losing data if you try to defragment a corrupted filesystem.
The Windows 98 Defrag has fewer settings. Again there is an option to check the drive for errors, and one to tell Windows to rearrange your files so that they load quicker. I don't know of any downside to that option, and it does improve performance, so leave it checked.
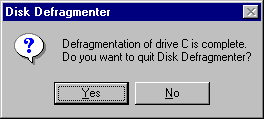
When Defrag is done, it will present you with this window. Just hit `Yes' unless you want to defragment another drive.
Scandisk and Defrag have some command-line options that you can use to customize their behaviour. But, since they are hard to remember, it makes sense to start them with a custom shortcut. Below I will present step-by-step instructions on creating these shortcuts.
The /A switch in the example above tells Scandisk to scan all the non-removable drives in the machine. The /N tells Scandisk to start automatically. The /P tells Scandisk not to automatically correct errors.
The /all switch tells Defrag to defragment all the local fixed disks. The /F tells it to do a full defragmentation. With /noprompt, Defrag will start automatically. The /detailed switch is optional, and just tells Defrag to run in the `Show details' mode.
You can now automatically scan or defragment all of your drives, in one easy step. Just double-click on one of the two new icons on your desktop. It can be a good idea, just before you go to bed, to double-click the Defrag shortcut and leave it running during the night. Just don't use your shortcuts to launch both Scandisk and Defrag at the same time. :-)
Both Scandisk and Defrag allow you to continue working with your computer while they run. Since they need to manipulate the drive at a low level, they will restart to re-read the filesystem information when a drive they are working with is written to. This can especially pose a problem when the Windows swap file used for virtual memory is on that drive. Windows may read and write the swap file even though you are not saving any files to that drive.
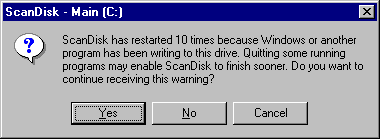
The dialogue box to the left shows a warning you may receive after Scandisk was forced to restart 10 times. If you want Scandisk to finish faster, it's probably a good idea not to continue running other programs during the scan. You may even want to quit some programs, or do a full reboot before you scan.
Note that even if it looks like you aren't running any other programs, memory could be being used up by the Windows disk cache, programs that are running in the system tray, and device drivers, leading to swap file usage.
Another common problem is screensavers that trigger during a Scandisk or Defrag. An easy way to prevent this is to click on the Start menu, but leave it open. Windows will not trigger your screensaver while the Start menu is displayed.
If you still have constant problems with Scandisk and Defrag restarting, try the following steps:
There are some more extreme remedies involving tweaking INI files or editing the registry to fix this problem. If you still need help with it, feel free to email the PuterGeek.
If you still have problems with Defrag (disk defragmenter), you might want to look at this Microsoft Knowledge Base article. This article only applys to Win98 and newer. This was brought to my attention by J.E.
You may be wondering, what sort of problems can occur that Scandisk corrects? And what does Defrag really do? Or if you're not wondering, just skip this section. :-)
The filesystem used by DOS and Windows 9x is called the FAT filesystem. There are a few different flavours of it. FAT12 is usually used for floppy disks and very small hard drives, FAT16 is used for medium-sized drives, and FAT32 for larger drives. Original versions of DOS supported only FAT12, but Microsoft introduced the later FAT systems to help cope with the increasing capacity of disk drives.
(There is some discussion of FAT16 versus FAT32 in the FDISK whitepaper here.)
There are two main structures that are used when working with files on a disk: Directory entries, and FAT tables. Files stored on the disk are also split up into blocks of uniform size called "clusters". There would be a lot more overhead involved in keeping track of where the files are on the disk if this was done on a byte-by-byte basis, so clusters help to keep access to your files efficient. The clusters on a disk are numbered sequentially as you fill a disk.
There is a directory entry for each file on a disk. It stores information such as the name of a file, the file attributes (read only, hidden, etc.), the size of a file, and the cluster number where the data for the start of this file can be found.
The directory entries tell us where the first cluster of this file is located, but the FAT table's job is to tell us where all subsequent clusters corresponding to this file are. Here is an example:

In this example, we see two directory entries, the dark blue boxes, and a small section of the FAT table, the light blue box. The cluster size of this FAT filesystem is 4k, and thus all the files are broken down into 4 kilobyte (4096 byte) chunks on the disk.
If we start with the first entry, FILE1.TXT, we see that it is 20298 bytes and starts at cluster 6. So the first 4096 bytes of this file are stored in cluster 6 on the disk. To find the next 4096 bytes, we look at the FAT table entry for cluster 6, and see the value 7. This tells us that the next 4096 bytes of the file are stored in cluster 7. That's still not the entire file, so we look at the FAT entry for cluster 7, and see that it points to cluster 8. We continue on in this fashion, until we hit the marker that says "End".
This structure, where each FAT entry points to the next one in a series, is called a linked list. The light green numbered circles follow the progression of links from each FAT entry to the one it points to. FILE1.TXT takes up 5 clusters, or 20480 (5 times 4096) bytes of disk space on the drive. Even though FILE1.TXT is 20298 bytes in size, the last cluster that is only partially used can't be shared with any other files. This means there are 182 bytes of wasted space at the end of the last cluster.
FILE1.TXT is not fragmented. The chain of clusters on the disk is sequential. This means that when reading the data from the disk, each cluster can be read immediately after the last one. Unfortunately, FILE2.TXT is fragmented. It jumps from cluster 5, to 11, to 13, to 12, as you can see by following the dark green numbered circles. This means that instead of reading the clusters one after the next, the disk must wait until its head has moved to the correct location. In our example, the performance penalty for this waiting is not so terrible, but files can get fragmented so that the next cluster in the series is on the opposite end of the disk from the last cluster. Your drive spends more time moving its head to the correct location of the data than it does actually reading the data.
What defrag does is reorganize the clusters that make up your files, so that they always are in sequential order, giving you the fastest reading of your files from the disk.
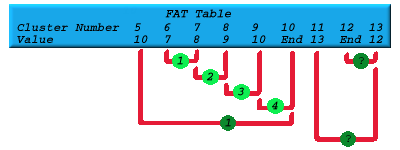
Scandisk will look for a whole bunch of possible problems with the data on your drive, such as invalid filenames, or wrong file sizes. This diagram shows a corrupted FAT table, to illustrate a couple of common yet not as easily understood errors. It is exactly the same as the diagram used for the above example, except the value in the FAT table for cluster 5 has erroneously been set to 10 instead of 11.
The first thing to notice is that both files are now using cluster 10. This is called cross linked files, and when this happens, both files will share the same data on the disk, and only one of them will have correct contents. Scandisk will, by default, fix this by giving each file a separate copy of the data. One of your files will still be corrupted after Scandisk does this, but at least your FAT tables won't be.
The second thing to notice is that clusters 11 through 13 still make a chain, but neither the directory entry for FILE2.TXT nor another cluster points to the start of this chain. These clusters are called lost clusters or lost fragments. They take up space on the disk, but there is no way to access them or know what filename they had. Scandisk will, by default, fix this by creating a directory entry in the root of the drive for this chain, with a filename like FILExxxx.CHK. The "xxxx" section is replaced by a number that counts sequentially upwards.
Most of these files contain garbage, but sometimes you can find important data in them. If you don't feel like digging around in your CHK files looking for lost data though, it's easier just to tell Scandisk to convert lost clusters to free space in the Scandisk options.
Now you know more than you ever wanted to know about Scandisk and Defrag. :-)
[ Home ] [ Site Map ] [ Site Search ] [ Back to last page ]